
How to Crochet a Granny Square: A Beginner Step-by-Step Guide
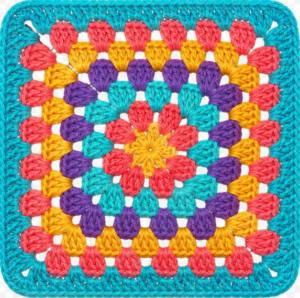
A classic granny square is one of crochet’s most useful building blocks. It is made in rounds from small groups of stitches, with increases at the corners to keep the fabric square. Once you learn the rhythm, you can make one square for a coaster, join many for a blanket or bag, or keep adding rounds to create a larger motif.
This beginner tutorial uses US crochet terms and explains the stitches, materials, and each round. You can work the square in one color or change colors between rounds.
What You’ll Need
- Worsted-weight yarn in one or more colors
- A 5 mm (US H/8) crochet hook, or the size recommended for your yarn
- Scissors
- A yarn needle for weaving in ends
Choose a smooth, light-colored yarn for your first square. It makes the stitches and spaces easier to see. The yarn label’s hook suggestion is a good starting point; a different hook may be useful if your stitches are unusually tight or loose.
Abbreviations and Stitches
This pattern uses US terminology:
- ch: chain
- sl st: slip stitch
- dc: double crochet
- sp: space
- cluster: three double crochet stitches worked into the same space
A chain-3 at the beginning of a round counts as the first double crochet in this tutorial. Keep that convention throughout so the edges stay consistent.
Start With a Center Ring
Make a slip knot and chain 4. Join the first and last chains with a slip stitch to form a small ring. If you are comfortable with a magic ring, you can use that instead. Keep the ring open enough to work stitches into it.
Round 1: Make the Four Corners
- Chain 3; this counts as your first double crochet.
- Work 2 double crochet into the center ring. You now have your first 3-dc cluster.
- Chain 2 to form a corner space.
- Work 3 double crochet into the ring, then chain 2. Repeat this two more times.
- Join with a slip stitch to the top of the starting chain-3.
You should have four clusters, with a chain-2 corner space between each. Fasten off and weave in the beginning tail later, or continue in the same color.
Round 2: Build the Square
- Slip stitch across the tops of the next two stitches and into the first corner space. This positions your yarn in a corner.
- Chain 3, then work 2 double crochet into that same corner space. Chain 2 and work 3 double crochet into the same space. The corner is made.
- Chain 1. In the next corner space, work 3 double crochet, chain 2, then 3 double crochet.
- Repeat step 3 in each of the remaining two corner spaces.
- Chain 1 and join with a slip stitch to the top of the starting chain-3.
Each corner now has two clusters separated by chain 2. The chain-1 spaces between corners create the sides of the square.
Round 3: Add Clusters Along the Sides
- Slip stitch into the next stitches and into the first corner space.
- Chain 3, work 2 double crochet into the corner space, chain 2, then work 3 double crochet into that same space.
- Chain 1. Work 3 double crochet into the next chain-1 space along the side, then chain 1.
- In the next corner space, work 3 double crochet, chain 2, and 3 double crochet.
- Repeat the side cluster and corner sequence around the square. Join to the top of the starting chain-3 with a slip stitch.
You now have one cluster along each side and a corner cluster pair at every corner.
Continue for More Rounds
For each new round, move to a corner space with slip stitches. At every corner, work 3 double crochet, chain 2, 3 double crochet into the corner space. Along each side, work 3 double crochet into every chain-1 space, placing chain 1 between clusters. Join the round with a slip stitch to the top of the starting chain-3.
Each round adds one more cluster to every side. Continue until the square is the size you want. To make a small motif, a few rounds may be enough; for a blanket-size square, keep going and check that the edges remain straight.
Changing Colors
To change color neatly, finish the round and join with a slip stitch. Fasten off, leaving a tail long enough to weave in. Attach the new color in a corner space with a slip knot or by drawing up a loop, then begin the next round. Weave each yarn tail through several stitches on the back with a yarn needle. Avoid relying on a knot alone to secure an end.
For a one-color square, do not fasten off between rounds. Slip stitch across to the next corner and continue. The joining point may form a slight seam; keeping your joining method and tension consistent helps it look tidy.
How to Keep Your Granny Square Flat
- Count the corners: each round needs four corner spaces, with two clusters in each corner.
- Use the spaces: place side clusters into the chain spaces, not into the tops of the stitches below.
- Check the corners: the chain-2 space gives each corner room to turn. If the work cups, check that you have not missed a corner increase.
- Relax your tension: very tight chains and stitches can pull the square inward. Try a larger hook if needed.
- Keep the pattern consistent: use the same chain spacing and joining approach in every round.
A little waviness can come from uneven tension. After finishing, gently block the square if your yarn allows: dampen it according to the yarn-care instructions, shape it into a square on a flat surface, and let it dry fully.
Finishing the Square
After the final round, fasten off and pull the yarn through the last loop. Thread the tail onto a yarn needle and weave it through several stitches on the back, changing direction once so it is secure. Weave in the starting tail as well, then trim only the excess.
If you plan to join several squares, make them all with the same number of rounds and a similar tension. Lay them out before joining to check the color arrangement. You can sew them together with a yarn needle or crochet them together with slip stitches or single crochet.
Quick Pattern Recap
Start: Chain 4 and join into a ring. Round 1: Four 3-dc clusters in the ring, with chain 2 between clusters. Round 2 onward: Work 3-dc clusters in the spaces; at each corner, work 3 dc, chain 2, 3 dc. Separate side clusters with chain 1. Join each round with a slip stitch.
Frequently Asked Questions
Can I start with a magic ring?
Yes. A magic ring lets you tighten the center after working the first round. A chain-4 ring is a simple alternative if you are new to crochet.
Why is my granny square curling or cupping?
It may be too tight, or a corner increase may be missing. Check that every corner has the two clusters separated by chain 2, and try loosening your tension or using a larger hook.
How many rounds should I make?
There is no fixed number. Stop when the square reaches your desired size, or use the same number of rounds for every motif in a multi-square project.
Does the starting chain count as a stitch?
In this tutorial, chain 3 counts as the first double crochet of the round. If you use a different pattern that says otherwise, follow that pattern’s instructions consistently.
Your first square does not need to be perfect. Focus on the four corners and the repeating groups of three double crochet stitches; after a few rounds, the pattern becomes much easier to recognize.