
Crocheting a flower is one of the most rewarding quick projects for yarn lovers. Whether you want to add a handmade touch to a cozy beanie, customize a tote bag, or create a colorful floral garland, this simple 5-petal crochet flower is the ultimate beginner-friendly project.
If you are new to the craft, don’t worry—this step-by-step guide breaks down every single stitch so you can craft your very first bloom in under 30 minutes!
Project Overview
- Skill Level: Absolute Beginner
- Time Required: 20–30 Minutes
- Essential Supplies:
- Medium/Worsted Weight Yarn (Category 4)
- 4.0mm (G-6) or 5.0mm (H-8) Crochet Hook
- Scissors
- Tapestry / Yarn Needle
Step-by-Step Instructions
Step 1: Gather Your Yarn and Tools
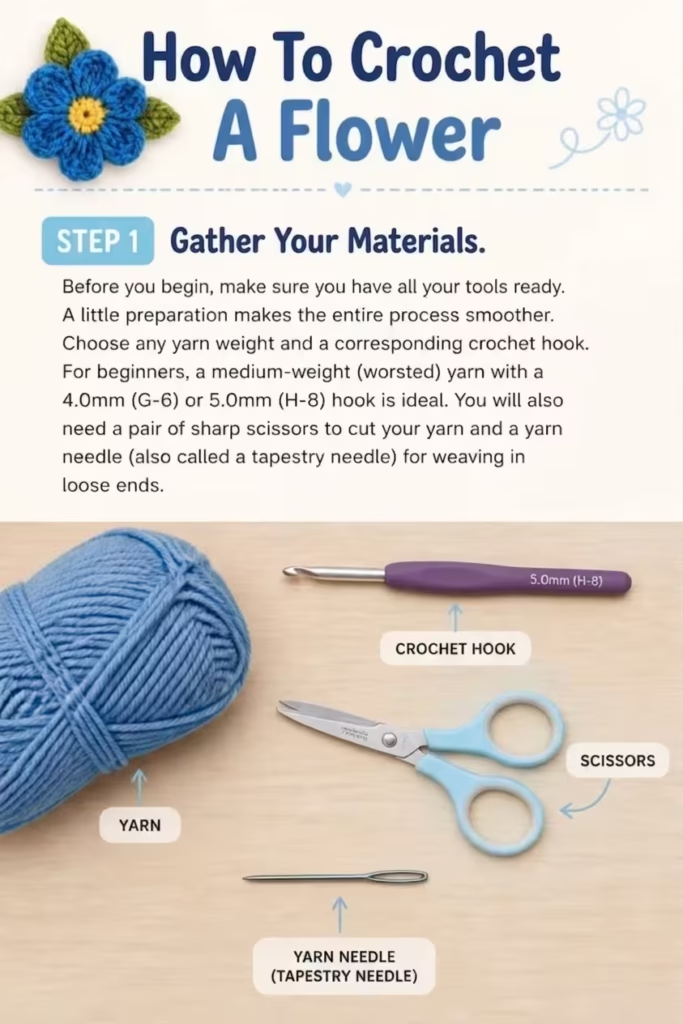
Before starting, prepare your workspace. Using a smooth, light-colored worsted-weight yarn makes it much easier to see your stitches as you work. For hook selection, see our guide to choosing the right crochet hook and yarn before matching your yarn to a comfortable 4.0mm or 5.0mm hook.
Step 2: Make the Center Foundation Ring
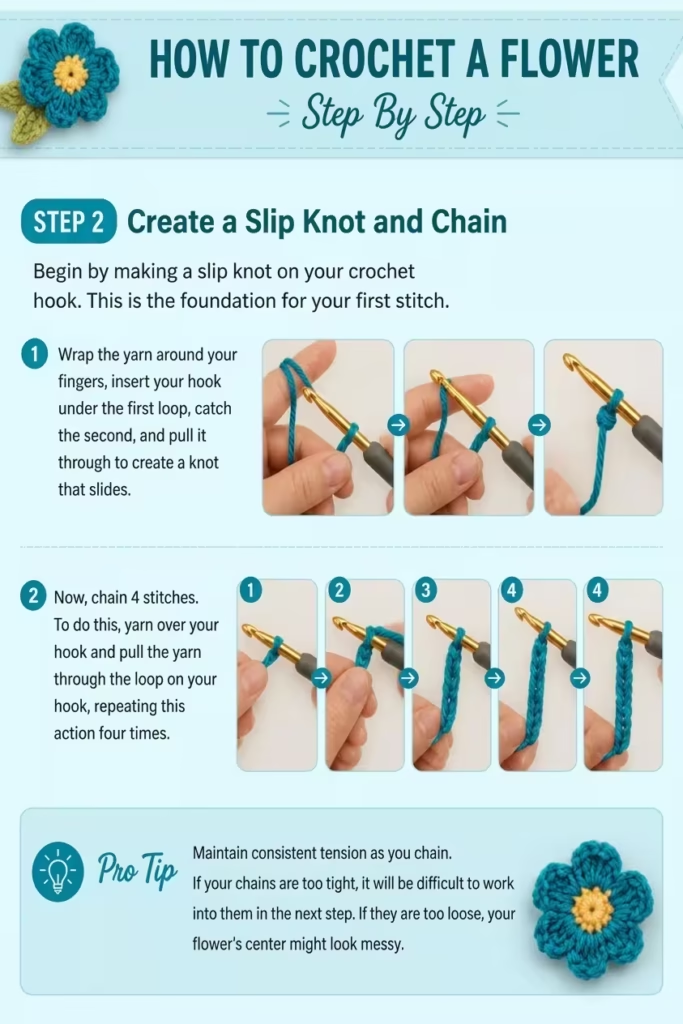
- Start with a Slip Knot: Secure the yarn onto your hook.
- Chain 4 Stitches: Yarn over and pull through four times to create your foundation chain.
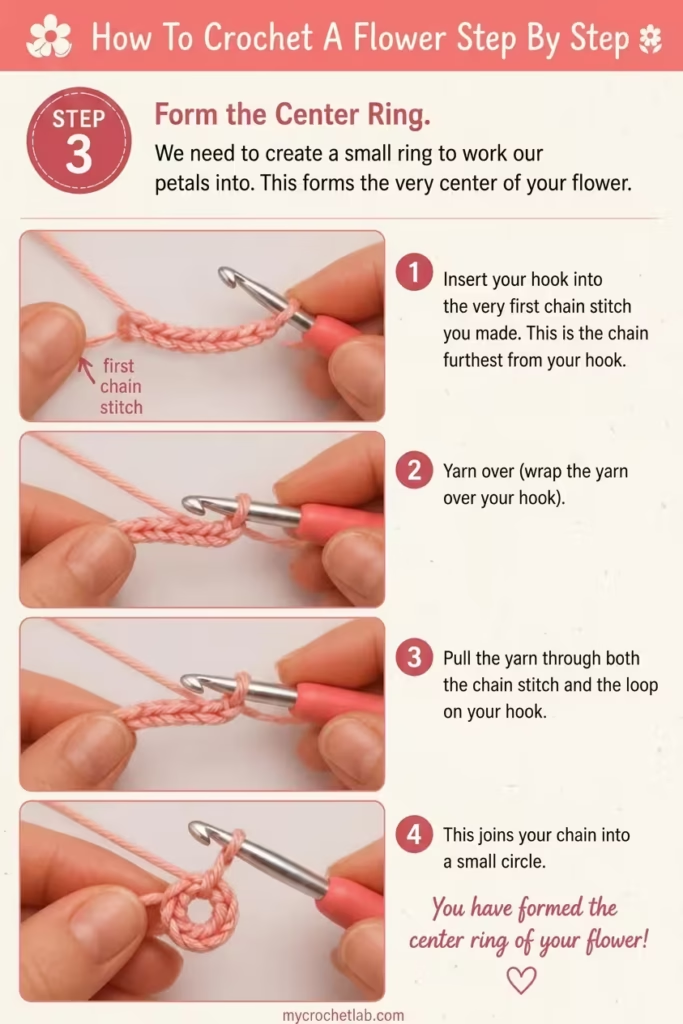
- Form the Ring: Insert your hook into the very first chain stitch made (the one furthest from your hook). Complete a slip stitch by pulling the yarn through both the chain stitch and the loop on your hook to form a small circle.
Pro Tip: Keep your tension relaxed while making the foundation chain. If your stitches are too tight, working inside the ring during the next step will be difficult. For more beginner troubleshooting, read our guide to common crochet mistakes.
Step 3: Crochet Your First Petal
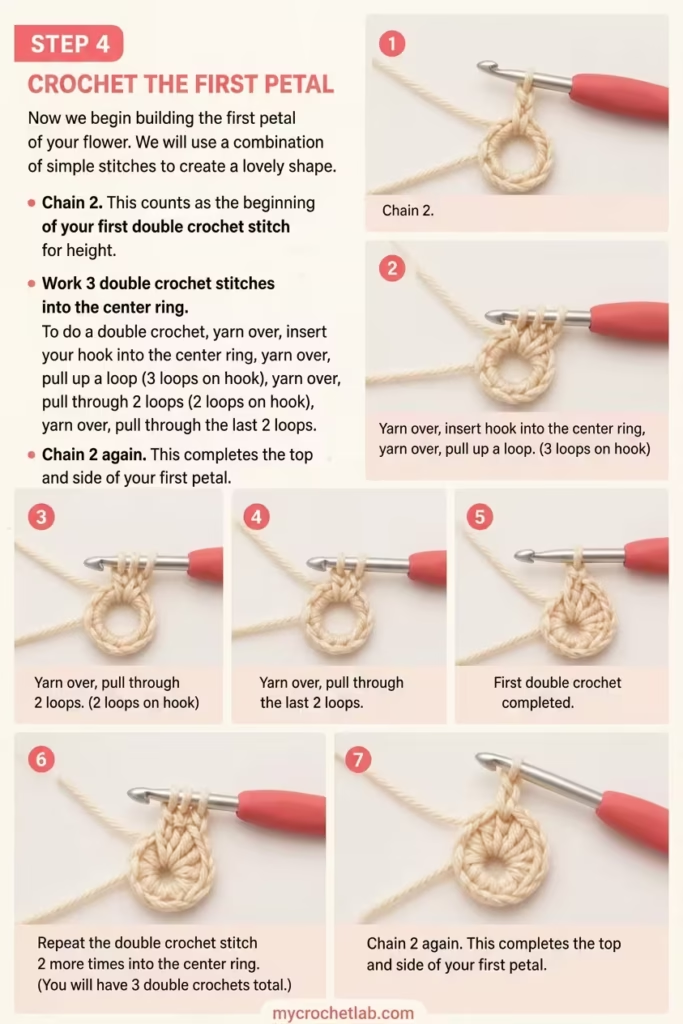
All your stitches for the petals will be worked directly into the open center ring you just created.
- Chain 2: This provides the necessary height for your petal.
- Work 3 Double Crochets (DC):
- Yarn over, insert your hook into the center ring, and yarn over again.
- Pull up a loop (3 loops on hook).
- Yarn over and pull through the first 2 loops (2 loops remain).
- Yarn over and pull through the final 2 loops.
- Repeat this sequence until you have 3 double crochet stitches inside the ring.
- Chain 2: This forms the sloping edge of your petal.
- Anchor the Petal: Work a slip stitch directly into the center ring. This secures your first petal into place.
Step 4: Repeat to Form a 5-Petal Flower
To complete the flower shape, repeat the exact petal sequence 4 more times into the same center ring:
- (Chain 2, 3 Double Crochet, Chain 2, Slip Stitch into the ring)
Once finished, gently slide the stitches around the ring with your fingers so all 5 petals are spaced evenly around the center.
Step 5: Fasten Off and Weave in Ends
- After your final slip stitch, chain 1 to lock your work.
- Cut the yarn, leaving a 6-inch tail for finishing.
- Pull the tail completely through the remaining loop and tug gently to tighten the knot.
- Thread your yarn needle and weave both the starting and ending yarn tails through the back loops of your stitches in a zigzag pattern. Trim any excess yarn cleanly.
Frequently Asked Questions (FAQ)
What is the best yarn for crocheting flowers?
Cotton yarn (DK or worsted weight) is ideal for crochet flowers because it gives crisp stitch definition and holds its shape exceptionally well. Acrylic yarn also works wonderfully for softer appliqués on blankets and hats. For more help choosing fibers, read our guide to the best yarn for baby blankets.
How do I make my crochet flower larger or smaller?
To change the size of your bloom, simply adjust your yarn weight and hook size. Use a fine lightweight yarn with a 3.0mm hook for delicate mini flowers, or chunky yarn with a 6.0mm hook for a large statement flower.